GW2 The Dragon’s Reach Part 1 Living Story achievement guide with written and video guides. Guide is now complete and includes achievements in both Waypoint Conundrum and Foefire Cleansing instances.
Contents
Waypoint Conundrum
There are three achievements here, you will need to do at least two runs of this instance to get all the achievements., One run to get Nary a Pitfall and another run to get Leave No Survivors and Crate Scrapper achievement since getting Leave No Survivors automatically fails you for Nary a Pitfall.
- Thanks to Varangr Firemane and Falcon who sent me their maps/tips on the achievements.
Nary A Pitfall – 10 pts
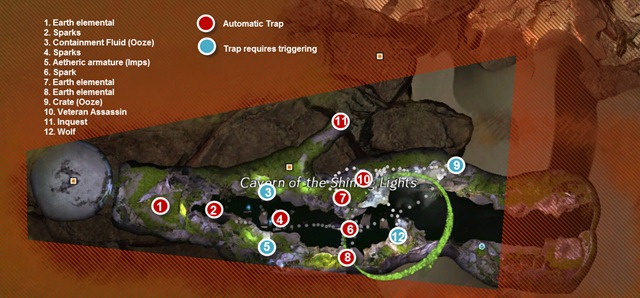
Fairly easy achievement. Avoid the trap at location 1 and 2. Then for trap #3 which you need to get Containment Fluid tell Scruffy to Reinforce the Containment Device. For trap #5 make sure you do close generator –> open casing –> deactivate the aetheric field sequence. Then you need to skirt around trap 4 and 6 to get to trap 12 where you just pick the chest that allow you to open it directly without having to move containers (yellow triangle sign in the dialogue box).
- If you have any doubts about where a trap is, tell Scuffy to do a scan. This isn’t perfectly safe as Scuffy as to be almost next to a trap for him to reveal the trap circle.
You cannot get the achievement until you return to Taimi and listen to all the conversations until the very end of the instance after you have talked to Kasmeer. So once you got all 3 items, keep avoiding traps on your way back to Taimi.
Leave No Survivors – 15 pts
To get this achievement, you have to trigger all 12 traps marked in the map below. It is easiest to do with 2 players as traps 10 and 11 is tricky to get solo.
- Traps 1, 2, 4, 6, 7, and 8 are fairly straight, just run into the area and mobs will spawn.
- For trap 3, you need to interact with any of the containers to spawn Oozes that you need to kill.
- For trap 5, you have to pick – Turn off the generator –> Open generator’s casing –> Grab the armature off the aetheric field to spawn a portal with Imps. Once you killed it, do it properly to proceed (i..e close generator –> open casing –> deactivate the aetheric field)
- For trap 9, this is the same crate you used for the Crate Scrapper achievement to spawn the champion Ooze which is actually really easy to kill.
- For trap 10 and 11, this is a bit tricky. When you spawn the Veteran Assassin at trap 10, the doors at trap 11 will open with some Inquests inside. The Veteran Assassin will you attack and once you get her below 50% she will start running towards trap 11. If you kill the Veteran Assassin before she reaches the door, the door will close and you lose access to trap 11. If you don’t, she will disappear once she is past the door and you lose access to her. It is best to have two players where one camp by trap #11 and kill the Inquests inside immediately once Trap #10 triggers. That player can then run back to trap #10 and help finish off the assassin.
- You might be able to do trap 10 and 11 solo by triggering #10 and then immediately run to #11 door before the assassin could attack you. Alternatively, you can use Scuffy to get aggro on the Inquest by turning on his defense mode first before triggering the trap and hope she is sticks on him while you deal with #11.
- Trap 12 is the last one you have to do since if you do this step early you lose access to the achievement. You have to find the chest that require you to Move the Containers with a red crossed sword sign. Picking this option will spawn a wolf that hits fairly hard.
- Once you completed trap 12, you will immediately get the achievement without having go back to Taimi.
Crate Scrapper – 5 pts
You automatically get this achievement when doing Leave No Survivors as this is just trap #9
Foefire Cleansing
Like the first instance, you need to run this instance at least twice to get all three achievements since two of them conflict with each other.
Don’t Knock Yourself Out – 10 pts
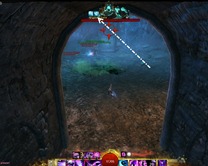
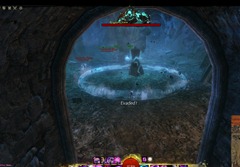
This achievement may take you a couple tries and tend to be easier in group of two since you can have one player focus on damaging the statue while the other deal with everything else. Ranged weapons are favored unless you can time your dodge. Having condition removers will help with chill that gets applied frequently. You need to avoid the knockdown circles from the Possessed Statue that comes in a huge AoE circle and smaller circles with rocks falling down. The large circle is very easy to avoid if you stay at max ranged but the smaller ones may need some extra attention.
- If you are really having trouble with this achievement, there is a safe spot posted by Zymosis on top of some rocks to the left of the statue in the comments section below that you can take a look.
In addition to these AoE circles, Spectral Flame orbs will also spawn at back of the room and chase you around for a while before disappearing. If they get close to you, they will do a knockback so your goal is to kite them around.
Other than knockbacks and knockdowns, you will also need to deal with Fear Wards placed on the ground. While they don’t knock you down or back, they can potentially fear you to a bad spot. The other two concerns are the adds you need to kill to make the statue not immune and the menders that spawn every so often.
If you are skilled, you can get this achievement and Not so Buff Now in one go by killing Menders before they can reach the statue while avoiding everything else.
Not So Buff – 5 pts
You can get this achievement at the same time as Don’t Knock Yourself Out by killing the menders before he reaches the statue and heal him. It is a fairly easy achievement and you can do it separately to make it easier.You cannot get this achievement on the same run as Strike’s Over since for that achievement you need to let 3 menders through.
Strike’s Over – 15 pts
To get this power attack, you have to let 3 Menders heal him so he gains 3 stacks of a stacking buff. A few seconds after reaching 3 stacks, he will pull his hammer up and slam the ground, creating a massive shockwave in the middle of the room that make up this power attack.
The trick is basically not do anything until 3 Menders heal him (since they will heal him to full anyways) and stand a bit away from middle of the room and just dodge that shockwave. Once you dodge that shockwave, proceeed the fight as normal and do not let him get healed again.

Archived Disqus comments
Tetzlat
I used scruffy to keep the veteran at nr 10 in combat, then i killed the mobs at 11 and returned to scruffy to finish the veteran. The rest works fine
Tyler
I tried this and the vet assassin immediately went invul when I left, and I couldn’t kill her. Perhaps she was aggroed onto me and not scruffy though.
Min Gorad
BTW Do any 1 knows where is the 5th event in Iron Marches for the Achievement Mordern Problems? I’ve done The Gravelash , Champ, entangled Workers and Wolf, but can’t seem to find the 5th Event…
Infophile
It’s bugged currently and won’t spawn. You’ll have to wait for a fix.
Ruinell
You can proc #10 in stealth and sneak out unnoticed. You can then wipe #11 and come back for the kill.
sophi444
97/hr pavivdv by Google, I am making a good salary from home \$5500-\$7000/week , which is amazing, under a year ago I was jobless. I thank God every day I was blessed with these instructions and now it’s my duty to pay it forward and share it with Everyone, Here is I started…………..
————————————————
……….PAYRAP.ℭℴℳ…………
————————————————
GO TO THE SITE –>> CLICK FINENCIAL REPORT FOR MORE DETAIL